A Guide to Filling Out Your Online Rental Application
After you've accessed your online rental application using the ApplyLink™ provided by the Agent/Owner, you may begin filling it out.
*Please note the steps to complete a submission may look different for certain users as we are beta testing and re-organizing the TransUnion screening steps.
Here is a step-by-step guide to walk you through each part of our Online Rental Application and Tenant Verification Package:
1. Once an ApplyLink has been opened on a web browser, you will be asked to sign up for a RentSpree account with your email, Google account, or Facebook account

2. Once you have created your account, you will be taken to the beginning of your submission - click Get started

3. You will then be brought to the Submit Your Application page, and under the Rental Specifics row, click on Start
- If you've completed a RentSpree application previously, your previously entered information will be automatically included in future submissions
- Click the Edit button under the Rental Application to View/Edit information before submitting

4. The first page will ask if you're the tenant or co-signer/guarantor and your agent's information if you're working with one
-
- If you're the tenant, you'll be asked to enter your preferred move-in date (Please check with your agent to see if this date is available)
- If you're the co-signer/guarantor, you'll be asked who you'll be co-signing for

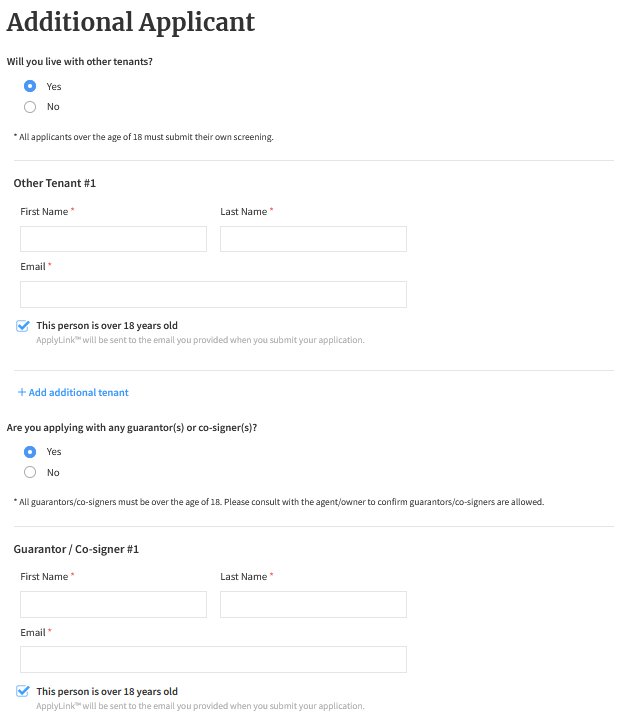
5. If you are applying as a tenant, you'll be asked if you'll be living/applying with other tenants and if you have a co-signer/guarantor
- If you are applying with another applicant or co-signer/guarantor, you'll have the option to send the ApplyLink automatically to each individual over the age of 18, after you've completed your submission

6. After completing the Rental Specifics, you'll be redirected to the Submit Your Application page where you can select Start in the Rental Application row to continue your submission

7. The first section, Personal Information, you'll be asked to enter your name, date of birth, and phone number

8. Select your current housing type (Rent or Own) and fill out all of the required fields depending on which type of housing you currently live in. Click Save & Next to continue.
-
- If you select Rent, you'll be asked to enter the Rental Information such as Monthly Rent, Landlord/Property Manager's Name, Email, and Phone Number


9. In the next section, it is recommended that you fill out your previous residence as well. However, you should contact the requesting agent/owner for confirmation on how many years of residence history they would like. Click Save & Next to continue.

10. Next, select your work status (employed, unemployed, student, retired) and fill out your current and previous occupation information on the following pages. Click Save & Next
-
- There is a section to add any additional income you receive and ensure the total monthly income amount is accurate.

Note: Properties in California will see options to add Subsidy. Please click here for more information regarding the subsidy change.

11. As with the previous residence, it is recommended that you fill out your previous occupation as well. However, you should contact the requesting agent/owner for confirmation on how many years of occupation history they would like. Click Save & Next to continue.

12. In the next step, enter all the references you would like to include in your rental application

13. In this step, select if you have a pet and if so, enter your pet's information

14. You'll then be directed back to the overview page and have the chance to look over all your information before submitting
-
- After completing the Rental Specifics and Rental Application, you may be asked to upload other documents such as pay stubs, bank statements, and more
- Moreover, you may be asked to complete a TransUnion screening after entering information in the Rental Specifics and Rental Application section
- The information entered for the TransUnion screening is separate from the Rental Specifics and Rental Application
- If you'll be applying to multiple listings, please sign up for our Reusable Screening Package!

Congratulations! After you click the Submit Application button, your agent or landlord will receive a notification in their email. This will notify them that your application is ready to view on their dashboard.
To view your application, access your Applicant Dashboard by clicking MY DASHBOARD on the home screen or clicking on the View Application button.
